Making caramel apples is a fun way to dive into the fall season. Dip these delicious treats for yourself or as gourmet gifts for your friends and family.
“An apple a day keeps the doctor away.”
Eh, that phrase probably doesn’t mean caramel apples, but here’s to hoping!
We’ve got everything you need to make classic or gourmet caramel apples (minus the crisp Granny Smith Apples- grab those on your own ? ).
Here is a list of the supplies that you will need:
- Peters Caramel 5lb Loaf
- Apple Skewers
- Parchment Paper
- White Chocolate
- Milk Chocolate
- Dark Chocolate
- Sprinkles
- Nuts
- Mini Marshmallows
- Colored Chocolate
- French Ovens
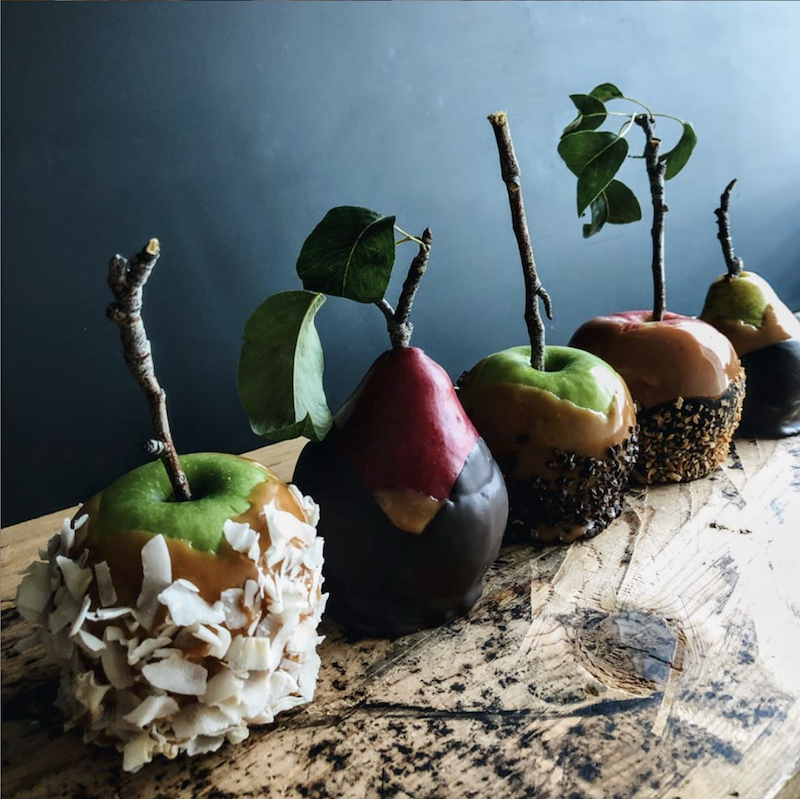
Buy green Granny Smith apples. The tart flavor of green apples works very well together with the sweet buttery flavor of caramel. (One 5lb loaf of caramel will cover approximately 20-25 medium apples.) Turn oven to 200 degrees. Place the Peters Caramel Loaf in a cast iron french oven (or a heavy pot with a lid) and place in the oven. The caramel will take at least 2 hours to melt and get to a working temperature. Aim to heat your caramel to 170-180 degrees. Alternately, if you don’t have a French oven, you can melt your caramel in a microwave-safe dish. Watch it carefully you do not want it to overcook (read: hard caramel breaks teeth!) Cook on high for 1 minute. Stir. Reduce power to 50% and cook for 1 minute. Stir. Continue cooking at 50% until the caramel is melted. You may need to microwave it a few times throughout the process, as it seems to harden more quickly. Clean the apples. Most growers coat their apples before they arrive in the store. The wax coating is for aesthetics and to help keep the apples fresh. To remove the coating use warm water and a scrub brush. Then dry with a dish towel and remove any excess wax. Once the apples are clean and dry let them get to room temperature. Insert the Wood Skewers into the apples after you have removed the stem. Make sure that the stick is in tight so when applying the caramel it the apple will not fall off the skewer. Remove the pot of caramel from the oven and stir sparingly. We've noticed that the more you move and stir the caramel the more bubbles and air you will get on your apples. With a spoon in one hand and the apple on a skewer in the other start to lift the caramel onto the apple while turning the apple at the same time. Continue coating the apple with the caramel, try not to scrape the apple with the spoon, just let the caramel and gravity smooth it out! Tip your apple upright, so the stick is pointing up, and pull the apple out of the caramel slowly. This will help pull any extra caramel smoothly back in to the pot. Hold the apple and and allow the excess to drip back into the cast iron pot. Use a silicone spatula to scrape any excess caramel off the bottom. Then turn it upside down for a moment as it cools to allow the caramel to set for a second before setting down. Place the apple on a cookie sheet lined with parchment paper with the stick up. You can now add toppings directly to the caramel, this works best if you are doing larger ingredients (crushed pretzel, candy bar pieces, nuts) Roll the caramel directly into the toppings, use your hand if needed to press the toppings into the caramel surface. Do NOT immediately dip into chocolate, it will melt right off the surface! Stick your apple in the fridge on a piece of parchment paper to help the toppings and caramel set. If you are dipping your apple in chocolate or drizzling chocolate over your toppings, you MUST allow the caramel to cool. To speed up the process place a piece of parchment paper on your fridge shelf, and put the apples directly in the fridge after dipping. Once cooled you can apply chocolate and other toppings. Melt the chocolate in a microwave in 1-minute segments at 50% heat until it is partially melted and lumpy. Stir in between rounds to prevent scalding. Dip cooled apples into chocolate, scrape excess off the bottom, and hold upside down for a moment to set chocolate. If adding toppings, allow it to set for a few seconds to avoid sliding. If drizzling with different colors, allow chocolate to harden completely to avoid blending. Place in fridge or outside immediately to keep toppings in place. Bring apples to room temperature, cut the apples from the stick and enjoy your delicious fall treat with family and friends. Perfect Caramel Apple
 (1 votes, average: 5.00 out of 5)
![]() Loading...
Loading...Ingredients
Instructions
Here are a few of our favorite topping combinations:
Apple Pie- White chocolate covered sprinkled with cinnamon and sugar (best with Granny Smith)
Candy Bar- Dark Chocolate covered in crushed Candy Bar (Snickers, Butterfinger, Reese’s Peanut Butter Cups, Heath bar)
Trail Mix- Milk Chocolate drizzled over chopped nuts and dried fruit
Oreo- White chocolate with crushed Oreo
Salted Pretzel- Dark Chocolate with crushed pretzel crumbs
Rocky Road- mini marshmallows, mini chocolate chips, chopped nuts and dark chocolate
Samoa- dark chocolate with toasted coconut
Dark chocolate with large coconut flakes
S’mores- dark chocolate, crushed graham crackers, mini marshmallows
Watch us melting and dipping a caramel apple:
Curious how to use your caramel in other ways? Read about pretzel rods, dyeing, flavoring and using your caramel.
Caramel Apple FAQ’s
Why does my caramel keep sliding off? We’ve found a few culprits to the dreaded pool at the bottom of the apple. Start at the beginning of the process, is your apple good and clean. Build up on your apple can create a barrier between the caramel and the apple skin. Make sure you scrub them really well. Second, if your caramel is too warm when you dip, it will drip right off. Aim to melt your caramel to 170-175 degrees for perfect adherence.
If you find a big skirt on the bottom after the caramel sets, you can use a small paring knife to cut the excess caramel off the bottom. Then, if needed, use your hand to smooth the edges. Once you cover it in chocolate and toppings, you won’t even notice!
What if I get bubbles on the caramel once it sets? Bubbles sometimes happen! If you find yourself with one (or twenty) you can let the caramel cool, then use a paring knife to pop the bubbles and smooth them out with the flat edge of the knife. If you’re adding toppings, no one will even notice the spots! To avoid the bubbles, try to limit the amount of stirring you’re doing. More stirring = more air in caramel = more bubbles!
Why does my chocolate slough off the caramel? The caramel needs time to cool before adding the chocolate. Pop it in the fridge and let the caramel get good and cold before dipping it in chocolate, then your chocolate will set much faster. If your toppings are still slipping off, allow the chocolate to cool, and set on the apple a little more before adding toppings.
How do I melt my caramel? Read this blog post with more ideas for melting your caramel.
How long do the caramel apples last? When stored in the fridge, your apples are great for up to a week. Out of the fridge, the apple will spoil a little faster, around 3-5 days depending on temperature.
How do I store the caramel apples? The best spot for a caramel apple is in the fridge. If you don’t have access to a fridge, an air tight bag or container will keep them, but varying temperatures can cause your toppings to melt. So just don’t keep them in the trunk on a hot summer day!
What’s the best way to eat a caramel apple? We like to cut ours right off the stick. If your apple has been in the fridge, let it come to room temperature first. Then, start by holding your apple by the stick, then cut parallel to the stick, all the way through the apple, turn, and cut. Rotate all the way around the apple until you have four chunks, then you can cut those into slices. We’ve found the best success to cut through the topping layer first and then the apple when slicing them, this helps to keep the toppings from falling off while cutting.
We’ve got a comprehensive list of caramel how-to’s, and tips for storing and preserving your caramel. Read more on this post.
No Comments